Seed Spacing

To help with spacing in a city garden, put a square foot grid over your garden bed. Below are templates for how closely you can plant the seeds or seedlings in your garden – we use four main sizes.

Seed spacing – X Large: One plant per four square feet, in the middle of the space. Includes summer squash, zucchini, and ground cherry.

Seed spacing – Large: Plant one plant per square foot, right in the middle of the square. Includes peppers, eggplants, broccoli, rapini, cabbage, tomato (climbing), and cucumber (climbing). Leave a space of 30 cm or 12″ between plants.

Seed spacing – Medium: Plant four plants or seeds per square foot, in two rows of two. Includes lettuce, kale, Swiss chard, broad bean, garlic, bok choy, spinach, roquette, or arugula. Leave a space of 15 cm or 6″ between plants.

Seed spacing – Small: Plant eight plants or seeds per square foot, in two rows of four. Includes peas (climbing) and beans.

Seed spacing – Small: Plant nine plants or seeds per square foot, in three rows of three. Includes beets and onion. Leave a space of 8 cm or 3″ between plants.

Seed spacing – X Small: Plant sixteen plants or seeds per square foot, in four rows of four. Includes radishes and carrots. Leave a space of 5 cm or 2″ between plants.

Now, put your knowledge to the test – go out there and get gardening!


Transplanting

Here are some tips for when your homegrown or store-bought seedlings are ready to be planted in the garden:

  1. To reduce plant stress and make them easier to handle, water plants before transplanting.
  2. Ideally you won’t have to touch the plant at all, but if this is necessary, avoid touching the stem and lift the plant by its leaves.
  3. The best time to transplant is in cloudy, cool weather. If this is not possible try to shade your seedlings with your body or an umbrella.
  4. Most vegetables benefit from being transplanted up to the first true leaves (burying the cotyledon – the leaves from inside the seed).

View our videos:
How to plant vegetable seedlings
Making space for summer seedlings


Direct Sowing

For vegetables you do not want to start indoors, you can plant them directly into the garden. As a rule of thumb, plant seeds three times deeper than the seed width. Seeds planted too deeply will not germinate. The garden soil should be wet, but not soggy before you start planting, so water deeply and then wait 15 min to let the water soak into the soil.

Check individual vegetable entries in the Urban Seedling Store for specific information per vegetable on planting depth and spacing.


Seed Starting

As mentioned in the Garden Plan section, Montreal has a short growing season, so you may want to start your seeds indoors. This also ensures good germination and can help protect your seeds from prey. Some vegetables, such as radishes, carrots, cucumbers, and squash, can be challenging to transplant, so it is important to know your vegetables – we suggest trying to seed start all your vegetables so that you can develop your techniques and see what works for you.

WHAT YOU NEED:

  • planting mixture
  • container with good drainage
  • seeds
  • heat mat
  • fluorescent lights

HOW TO DO IT:

  1. Check the timing for the vegetables you want to start
    Each family of plants has its own needs and considerations. For details on exactly when to plant which vegetables click on the vegetable names in the Seeds and Seedlings section. In general, start leafy greens 3 weeks before planting (mid-March), start tomatoes, peppers, and eggplants 6 weeks before planting (mid-April), and start cucumbers, beans, melons, and squash no more than 1 week before planting (mid-May). Most flowers and herbs need to be started in February.
  2. Prepare your planting mix
    There are several recipes floating around for seed starting, but we prefer to use worm castings or compost to grow our seedlings in a rich, fertile environment right from the beginning. The beneficial microorganisms found in fully finished, sifted compost  – and even more so in worm castings – take care of any fungus. For starting seeds we use our custom soil blend (1/3 compost, 1/3 peat moss and coconut coir and 1/3 organic gardening soil — pre-fertilized with natural, organic fertilizers), with a sprinkling of worm castings.
  3. Find containers with good drainage
    You can use toilet paper rolls, yogurt containers with holes punched in the bottom, or “cell packs.” If you are reusing a plastic container be sure to sterilize it with hot soapy water or a weak bleach solution. We like using CowPots or toilet paper rolls – as opposed to peat pots and fibre pots – because they can be planted directly into the garden, reducing transplant shock. We have found that peat pots and fibre pots don’t actually break down as is claimed.
  4. Soak your soil mix
    Next, place your container with the soil mix in it in a tray of water for at least an hour, then pour the water out and place your container back into the empty tray. Your mix should be moist, but not soggy. If you need to water again, pour water into the tray, not on top of the seeds.
  5. Plant your seeds
    A great rule of thumb for planting depth is three times the width of the seed. For tiny seeds like lettuce or carrot simply sprinkle them on the surface of your potting mix.
  6. Lights
    As the sun coming through your windowpane will be too weak to grow sturdy seedlings, your set up should ideally be on top of a heat mat and under some fluorescent lights. Instead of buying an expensive specialized growlight, try rigging something yourself by using a shoplight fixture (around $17 at the hardware store) and both a cool and warm lightbulb. You should fix the light about 15cm (6″) away from the plants.
  7. Bottom heat
    For successful, quick germination you need your soil mix to be up around 27⁰C. The best way to achieve this is using a heat mat, which provides bottom heat to your seedlings (set the seedling tray right on the heat mat) and keeps them warm. Otherwise you can keep them in a warm place like on top of an old refrigerator. Cover the tray with plastic until the seeds sprout and then uncover it right away.
  8. Hardening off
    A final step before moving your seedlings to their new life outdoors is acclimatizing them. You can harden off your seedlings by putting them outside in the shade for a couple of hours each day over a three-day period, lengthening the amount of time and direct sunlight they get each day.

Fruit, Berries and Vines

Adding fruit to your landscape can help brighten it up and provide you with delicious fruit all season long. There are a variety of fruit trees that do well in the Montreal climate, such as apple, cherry, peach, and pear, to name a few. Alternatively, you could opt for low-maintenance yet productive blackberry or raspberry bushes. These provide an important food source for birds, which are the number one consumers of pests in your vegetable garden.

Check out the endless opportunities for incorporating fruit, berries, and vines into your landscape in our garden centre, and feel free to give us a shout for more information.

Raspberry Festival


Companion Planting

Companion planting is where you plant different crops close to each other. This helps with nutrient uptake, pest control, pollination, and other factors that help increase productivity and plant health. Because the gardens we grow are in urban areas, they are smaller and planted intensively, so companion planting happens automatically.

When growing a vegetable garden, adding flowers and herbs attracts beneficial insects that will pollinate your fruiting vegetables, and predatory beneficial insects, which attack pests such as aphids, slugs, and cucumber beetles. You can choose edible flowers that make great additions to salads and deserts!


Making your garden plan

TIMING

Plant Hardiness Zones

There are nine zones across Canada that help tell us what can be grown where, with a rating of 0 being the harshest and 8 the most mild. Montreal is considered a Zone 5A, and has a very short growing season and hot summer. Because of this, we recommend taking a very seasonal approach to your vegetable garden. With a row cover for protection from light frosts, you can start your spring planting at the beginning of April, your summer planting at the end of May, and your fall planting at the beginning of September. Fall planting should last you until mid- to late-November, but should be wrapped up in early October if you want to try your hand at winter planting.

Different vegetables have different temperature and time requirements for reaching maturity. Because Montreal’s growing season is so short, some vegetables – like tomatoes, peppers, eggplants, onion, broccoli, and cabbage – should be started indoors and then transplanted into the garden.

Here is a sample of some seasonal plants you can put in your garden. For more detailed information on the needs of individual vegetables, you can check them out in our catalogue.

SEASONS

GARDEN PLAN

Here is an example garden plan for a 10′ x 3′ garden. Keep in mind that tall vegetables and climbing vegetables on a trellis need to go to the north side of the garden.

All dates are for planting in Montreal, which is in planting Zone 5a.

Spring planting – 1st week of April

Summer – 3rd week of May

Fall – 1st week of september


Choose Your Site

SUN

When deciding where to plant your vegetable garden, you must first follow the sun. Go to the sunniest part of your yard and pull out a compass – in order for your garden to flourish it needs at least six hours of direct sunlight each day! This is also important when considering where to place your plants, as taller plants should be placed on the north side of the garden to avoid casting shade on shorter plants.

WATER

Another essential is water – since your garden needs to be watered every day, it is helpful to have placed it near a water source, such as a hose or a simple drip irrigation system. The best time of the day to water is between 4:00-5:00 am, so if you’re not up for the early mornings you can use a drip irrigation system set to a timer. This will also help reduce water loss to evaporation on hot days, and problems with fungus from water droplets sitting on the leaves, as well as slugs from the soil being wet in the evening.

CONVENIENCE

While the initial planning of a garden is exciting, other activities can catch up with people and push garden care off the radar. To make sure your garden is getting the attention it deserves put it in a high-traffic area, such as near the back door. We like to switch things around a bit to get the ideal balance between convenience, beauty, and, most importantly, sun!


Cucumber Beetle

Description

Adult cucumber beetles are 5 mm (¼”) in length, greenish yellow and are identified differently by their backs. The spotted cucumber beetle has six large black spots on its back, and the western cucumber beetle has stripes instead of spots.

Effects

The cucumber beetle feeds on the nectar of cucumber, squash and melon flowers. The larvae suck the sap of the plants. The greatest damage comes from bacterial wilt which the cucumber beetles carry. It can wipe out an entire plant very quickly.

Control

It is important to control cucumber beetles early in the season. Once a population gets established in your garden, it is very difficult to get rid of them. Protect your garden with an insect net until they start flowering. Then you need to lift the net to allow bees and other pollinators in. If you find cucumber beetles at this point use a spray of hot peppers, water and garlic.

Repellent plants: Broccoli, calendula, catnip, goldenrod, nasturtiums, radish, rue and tansy. If you want to try marigolds to repel them use the more pungent varieties like African, French or Mexican marigolds.

Mulching can help since the larvae spend a part of their lifecycle buried in the soil at the base of the plant.


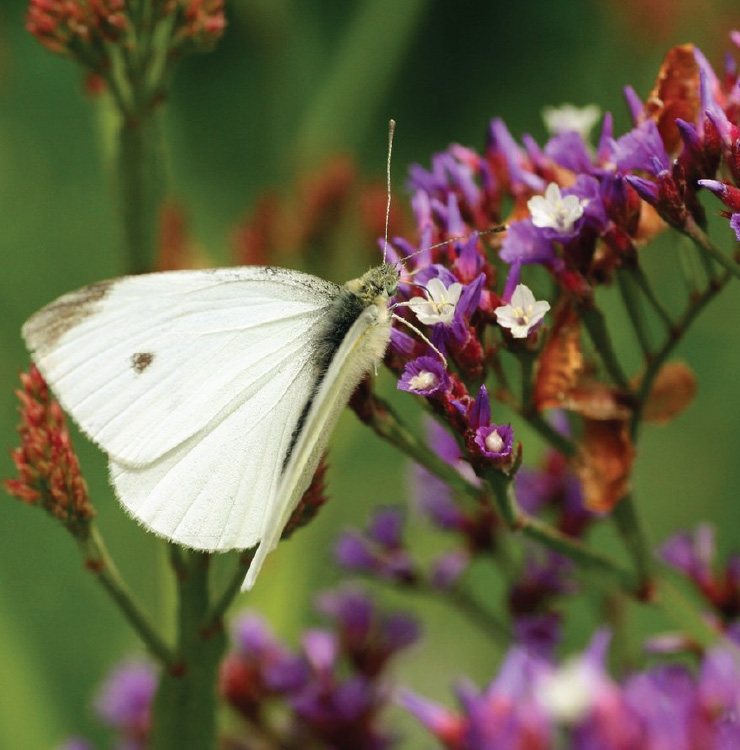
Cabbage Moth

Cabbage Moth

Description

Also known as Cabbage butterfly, or Cabbage white. These insects have a 4 cm (1.5″) wingspan. They often have a black spot on the top of their white wings. You can often see many of them flying around your vegetable garden. The caterpillar is green, fat, and about the same length.

Effects

The caterpillar eats many ragged holes in the leaves of brassicas such as cabbage, broccoli, kale, radish and bok choy. If you have an infestation, they can leave your leaves looking like lace.

Control

Prevent the butterfly from laying eggs in the garden. Cover your garden with an insect net in the spring to protect your garden. Once you take the net off in the summer to let in the beneficial insects, keep an eye out for the caterpillars and hand pick them off of the underside of leaves. Plant your garden alternating members of certain families. If brassicas are not beside each other, the cabbage moth will not lay its eggs and will fly away.


Slugs and Snails

Description

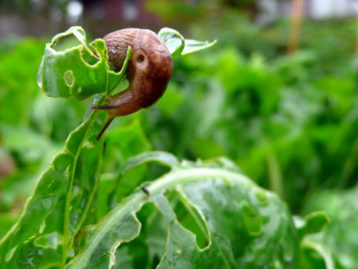
Slugs are slimy, rather gross creatures that eat plants and decomposing materials. Adults vary in colour from almost white to brown, grey and black. They prefer to feed at night. Snails resemble slugs with a shell, which they can hide in during the day. They will both however feed during the day in moist shady locations. Their movement is highly dependent upon moisture availability. They move by sliding forward on a trail of secreted slime. The slime has a silvery appearance and is often used to detect an infestation.

Effects

Snails and slugs feed on a variety of living plants and on decaying plant matter. They chew irregular holes with smooth edges in leaves and flowers and can clip succulent plant parts. They also can chew fruit and young plant bark. They leave discoloured patches in hardier leaves such as Swiss chard and beet greens.

Control

There are many ways to deal with slugs, but in an organic garden the best two are traps and handpicking. You should do both. Go out to your garden at dusk when the slugs are leaving their daytime hiding places and pick them off the underside of leaves and destroy. Mulching with crushed eggshells is a great method, but takes a lot of eggshells to be effective. The jagged edges discourage the slugs and snails.

You can trap snails and slugs beneath boards or flower pots that you position throughout the garden and landscape. Inverted melon rinds also make good traps. Construct wooden traps using 12″x 15″ boards (or any easy-to-handle size) raised off the ground by 1″ runners. The runners make it easy for the pests to crawl underneath. Scrape off the accumulated snails and slugs daily and destroy them; crushing is the most common method, but you can also drown them in a container filled with soapy water or rubbing alcohol. Don’t use salt to destroy snails and slugs, since it will increase soil salinity . Beer traps buried at ground level are also effective. They catch and drown slugs and snails that fall into them. Because it is the fermented part of the product that attracts these pests, you also can use a sugar-water and yeast mixture instead of beer.


Aphids

Description

Black, green or brown, small soft-bodied insects, pear-shaped; long antennae; two tubes projecting rearward from abdomen. They congregate in sap-sucking villages on stems and the underside of leaves. Often they will be patrolled by ants, who milk them as if they were cows for their sweet excretions.

Effects

Aphids suck plant sap, causing foliage to distort and leaves to drop; honeydew excreted on leaves supports sooty mold growth; feeding spreads viral diseases. They feed on most fruits and vegetables, flowers and trees.

Control

If you see a couple, leave them for ladybug lunch. If you have an infestation, knock them off your plants with a strong jet of water. Keep an eye out and keep spraying with a jet of water as necessary.